.
Showing posts with label tips. Show all posts

Grommets

TIPS...
In the past, the use of grommets on drapes was a real task because they were metal, expensive, and they required special installation equipment. Nowadays, drapery grommets are available at your local fabric store and they are plastic, inexpensive, and clip in!

It was recently that I experienced the ease of the plastic grommet while working on a drapery set for a client. To my pleasant surprise, the clip in grommets were as easy as the directions said they would be. All I needed to install the grommets were included with the package (except the scissors), which was a circle template used for making the hole and the grommets themselves.
I would highly recommend using clip in grommets for any skill level. The grommets come in a variety of colors and most of them don’t look like they are plastic, but some sort of brushed metal. Give them a try!

How to Conquer Dancing Duvets

TIPS...
Want to prevent your duvet from dancing within the cover?
Here’s how I finish my custom duvet covers:


I sew a loop of ribbon in each corner of the comforter. Then I turn the duvet cover inside out and sew a couple of ties to each corner, right by the overlocked edge. While the duvet cover is still inside out, I place the duvet flat on top of the cover, align the corners, pass the ties through the loops and then, tie a bow.

This makes easier to flip the duvet cover right side out without having to reach inside to hold each corner in place. And from the outside you can’t even tell.


This is a duvet cover I just made for a boat, that's why it has flaps! Yours probably ends at the welt or knife edge. Anyways... ties always work!

Try it, I promise your duvet will stay put!

Organizing your Inspiration

Stop storing all those magazines and start organizing them into inspiration books!... which are also known as “swipe files”.

I have subscriptions to craft, fashion and décor magazines that are loaded with fun projects, colors, ads, etc. Frequently, only a few pages out of the whole magazine contain a color, image, project or idea that I like and want to incorporate in some creative way. Over the years, I got tired of earmarking pages that interested me and so, I started to cut out the pages and recycle the rest of the magazine.

At first, I put the magazine cut outs into envelopes, but soon found that to be inefficient because every time I wanted to look for an image I had to dump out the entire contents of the envelope. From here, my swipe files evolved into fun, organized inspiration binders and scrapbooks!

I have a book for wardrobe, one for fabric, one for furnishings, etc. Sometimes I even use them with clients to illustrate diferent styles of furnishings. Now I am stating one for traveling, there are so many places I'd like to see... This can also work for events, gift lists, a crafty hobby and almost anyhing you are interested in.
There is no wrong way to create or organize your inspiration book as long as it inspires you to do something creative. All you need are some images, an adhesive like glue or tape, scissors, paper in any color you want (I prefer black) and some form of binding like a binder, a scrapbook or spiral notebook.


Since this book is just for you, you can organize it any way you like. You can have separate tabs for separate projects or topics or separate books altogether. The best part of your inspiration book is that your images don’t have to be literal, meaning; an image of a bathroom can be placed as an inspiration book for a bedroom or maybe an image of a pumpkin pie can be color inspiration for your fall wardrobe. You can also clip some text, web addresses are very helpful! and of course, add your own notes!

Lastly, my two bits of advice about the creation of your inspiration book is this: one, when you get the newest edition of your favorite magazines in the mail, it is time to clip last month’s and add it to your book. Second, have fun with it! Make your inspiration book a monthly treat for yourself when you can sit back and really let your creative mind wonder.

Neat Clips

TIPS...
Drapery clip rings are one of the easiest and functional hardware pieces on the market. Clip rings are especially great for households with children or pets that may pull on drapes because with a good tug the drapes come right off without ripping.


Unfortunately, clip rings are not the best looking. However, there is a solution to using the clip rings and still having a beautiful set of drapes. When making Cynthia's drapes, I created a pocket in the back of the drape where the ring clips into. This way, the functionality of the clip ring is intact without impacting the overall look of the drapes.

In this case, I made the pocket as I lined the drape with plaid fabric

The red one looks much cleaner, doesn't it?

The best thing about creating a pocket for the clip rings is that you can do this to most drapes, including the ones you buy in a package by sewing a strip of fabric to the back of the panel.
Look:

Cut a 2"x2" piece of medium weight fabric for each ring
Fold edges about 1/4" under and hand stitch around, leaving the top open,
without catching the fabric at the front of the panel

 Clip rings on.

Now your drapes look neat and timeless!

Try it and let me know how it goes.


Tools of the Trade

TIPS

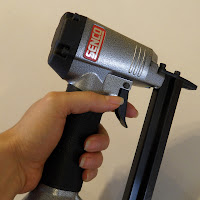
It is no secret that my favorite tool is a sewing machine but a close second is my pneumatic staple gun. I use this staple gun most often for any project where I need to affix fabric directly to a board like a window valance, a roman shade, even the small upholstery projects I am getting into now. At first, it was a little scary but once I got going… it is a lot of fun!


I have this small version. A compact compressor, light to carry and easy to store, feeds the also small (perfect for my skinny hands!) powerful and precise staple gun.


Love it! and very much recommend it to all of you do-it-yourself decorators out there.
Related Posts Plugin for WordPress, Blogger...